
This website uses cookies so that we can provide you with the best user experience possible. Cookie information is stored in your browser and performs functions such as recognising you when you return to our website and helping our team to understand which sections of the website you find most interesting and useful.
How to make your own Textured Canvas Wall Art?
Are you wondering if it’s possible to make your own textured wall art on canvas? Instead of spending hundreds of euro’s on an relief Artwork by some unknown artist you can also go creative and do it yourself! How cool to have your own Artwork in your interior? With the Assembli DIY Textured Canvas Toolkit you have unlimited options for creating your own style. The process of making is a very relaxing and mindful experience that rewards you with your own textured canvas artwork to be proud of.
How to prepare for making your own canvas wall art?
When you want to make you own wall art there are a few things to think about and prepare before starting.
- A Blank Canvas: first you need to decide about the size of the art on your wall. Do you want 1 bigger canvas or multiple smaller canvases to make a diptych or trilogy?
Get your ideal size(s) of canvases first. - Find workspace on a flat table, easy to clean (it can get a little dirty)
- Gather the tools to get creative
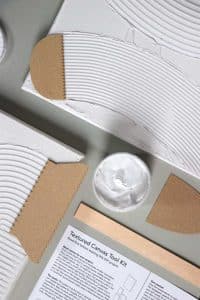
What tools do you need when making Textured Canvas Art yourself?
Working with the right tools will help you to create your own wall decoration. When starting you only need the basic materials to create textured wall art like the
- DIY Textured Canvas Toolkit with the right texturing paste:
1 kit is enough for a canvas size 50x70cm or 2 or 3 canvases of around 20x20cm. - Tools for texturing like a sponge, baking sheet, plastic foil, haircomb, or use the bioplastic spreader tools provided in the DIY Canvas Toolkit
- Spatula to mix, spread and flatten paste (also included in the Canvas Toolkit)
- Paper/ disposable cup or plate for the paint
- Paint in any colour: all kinds of acrylic or oil paint will work. Soft pastel colours will look great in combination with the white colour. You can also mix colour with white and make different shades from light to dark.
- Brush(es): painting brushes can be soft and small for the smaller parts or bigger for the background or all in one colour option.
How do you create a textured canvas artwork yourself?
You decide what you want to make and when it is finished. Remember it does not have to be ‘perfect’, it simply cannot go wrong!
Just follow these 3 easy steps to create your own textured canvas art:
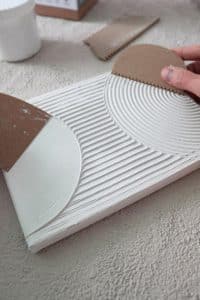
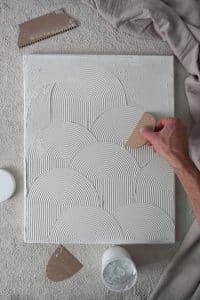
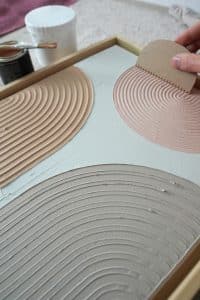
Step 1. Pasting and texturing your canvas
Prepare by getting all the tools you need and put your canvas on a big table and start pasting. The Canvas Toolkit contains the right texturing paste to try and go for your perfect design for at least half an hour. Take a look at some of the ideas for texturizing or some inspiration on shapes and colours here on Instagram.
When your shaping and texturing turned into a nice design, leave it to dry for a night.
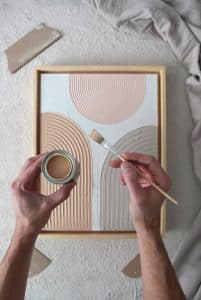
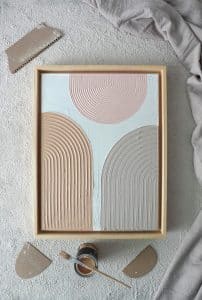
Step 2. Add some colour to your textured canvas art
Once it’s dry it has a nice matt off-white finish. Now it is time to decide if you want to leave your artwork minimalistic and pure like that. If you feel it looks too clean you can add some colour in your relief canvas artwork to make it really stand out. Paint some details or area’s to create highlights.
Step 3. Add a wooden frame for your canvas artwork as finishing touch
For the finishing touch you could think about using or making a wood frame for your canvas. A simple and low cost frame can be made by grabbing a saw and wooden slat to make the borders yourself. Use glue or screws to mount the slats to the canvas and clean up the edges with sandpaper.
What mistakes to avoid when making your own textured canvas art?
Because we want you to have the best result out of your DIY creative time here are the most common mistakes you want to avoid when making your DIY relief artwork:
- Do not use a wooden panel! Instead get or re-use a canvas.
The wooden panel gets wet and changes shape as wood works. So a wooden panel is not a very good idea if you want to enjoy your own artwork in your interior for some time. - Do not use standard plaster! Instead use the paste in the toolkit.
Standard plaster usually is very wet and gets cracked once it is dried. Unless a cracked effect is what you want on your artwork do not try this cheap option at home :/
Enjoy your creativity time!
Further instructions can be found within the product or on our Instructions page. Do you have a nice photo with your own textured canvas in your interior? Feel free to share it on Instagram with #assembli.
Would you like to stay updated about our new products, our cool lab where we create and share inspiration? Click here to sign in for our newsletter!
For more inspiration on DIY interior decoration with papercraft and more follow us on Instagram, Facebook or Pinterest.